# Top Page
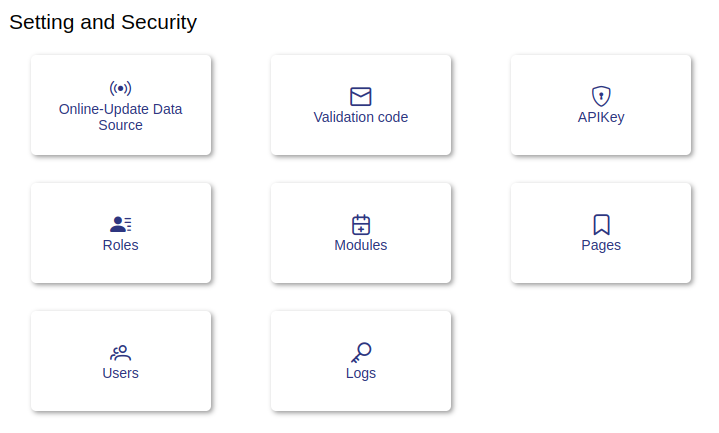
# 1.- Setting and Security
ℹ️ This module is only available to users with manager and administrator role.
User Interface.
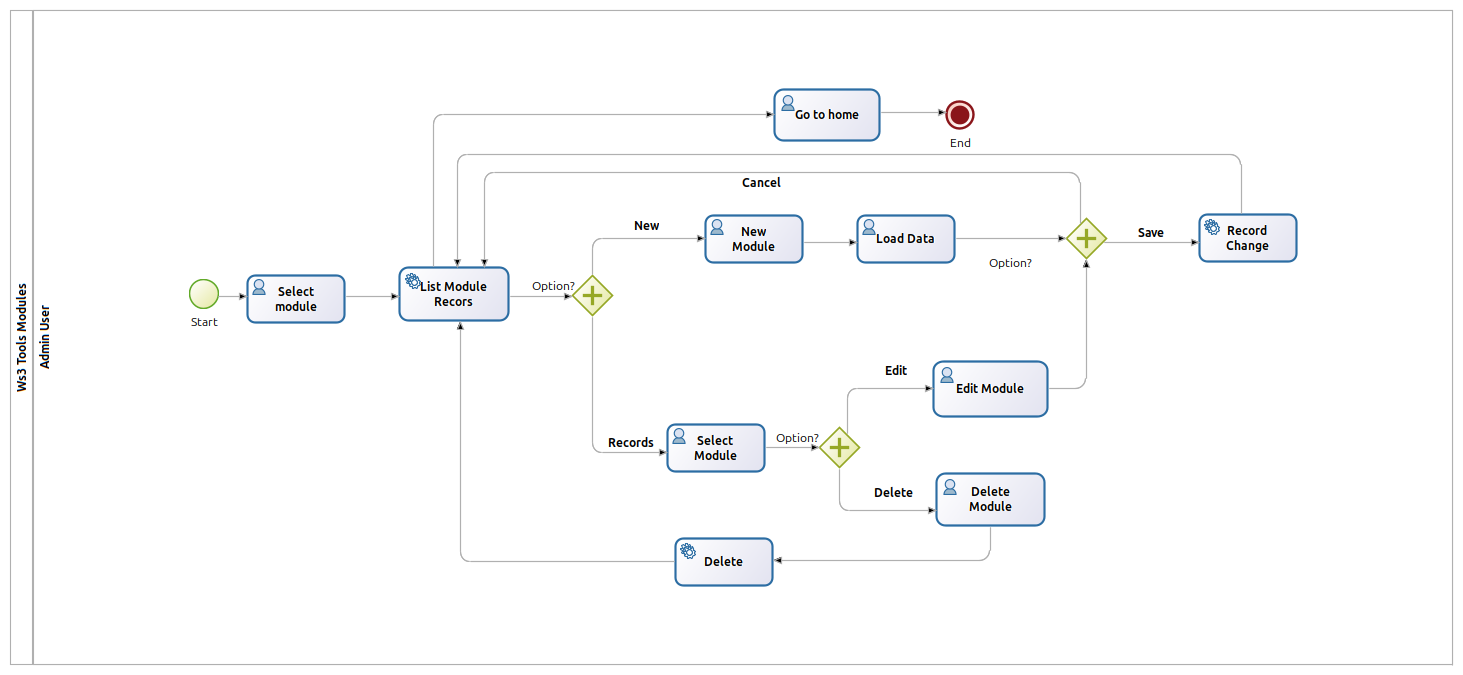
Process Map.

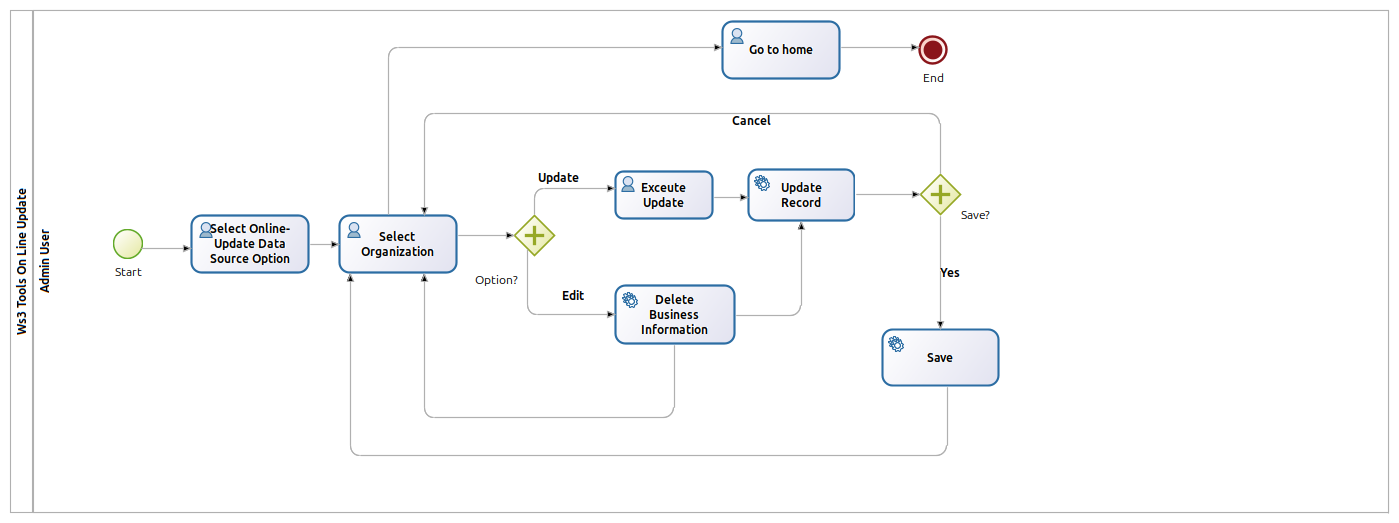
# 1.1- Online-Update Data Source
Clicking on the page shows the view that allows the administrator to edit the message with the code to recover the password.
Online-Update Data Source process.
User Interface.
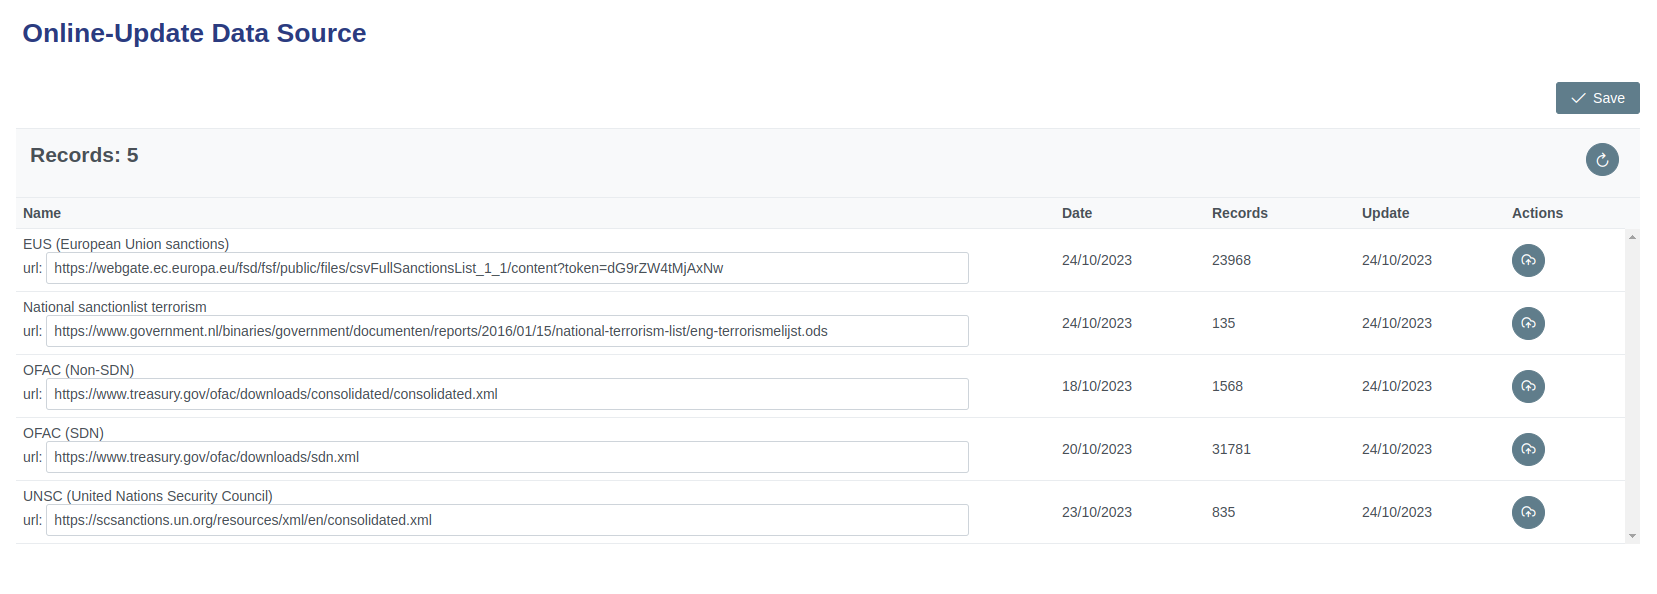
# 1.1.1- Components
| Icon | Label | Type | Description |
|---|---|---|---|
| ➖ | Records | Table | Show element of modules. |
| ➖ | Name | Table field | Show Name of the organization and download URL. |
| ➖ | Date | Table field | Show Date of update of the list by the organization. |
| ➖ | Record | Table field | Show Number of records. |
| ➖ | Update | Table field | Show Update date by the system. |
| ➖ | Actions | Table field | Show Command button to update lists. |
 | Refresh Button | Command button | Refreshes the table. |
 | Save Button | Command button | Save action. |
 | Update Button | Command button | Update List. |
# 1.1.2- Step by Step Update URL
✅ 1. Go to the organization page that you want to update the URL.
✅ 2. Verify and validate the URL.
✅ 3. Copy the new URL.
✅ 4. Paste the new URL into the appropriate field.
✅ 5. Click the save command button for the changes to take effect.
✅ 6. Verify that the change was executed successfully.
✅ 7. If you need to make another change repeat from step 1.
✅ 8. If you need to make another change repeat from step 1. If not continue with step 6.
✅ 9. In case you do not want use this module click on the icon identified as HOME at the top right of the page to return to the main screen of the system.
# 1.1.3- Step by Step Update List
✅ 1. Click the command button to update.
✅ 2. Wait for the list update process to run. It may take a while depending on the number of records.
✅ 3. Go to the website of the organization whose list was updated and check the dates of updating their lists.
✅ 4. Compare the update dates of the lists with the one displayed by the system.
✅ 5. If the dates match and you need to make another update repeat from step 1. If you do not run step 6.
✅ 6. In case you do not want use this module click on the icon identified as HOME at the top right of the page to return to the main screen of the system.
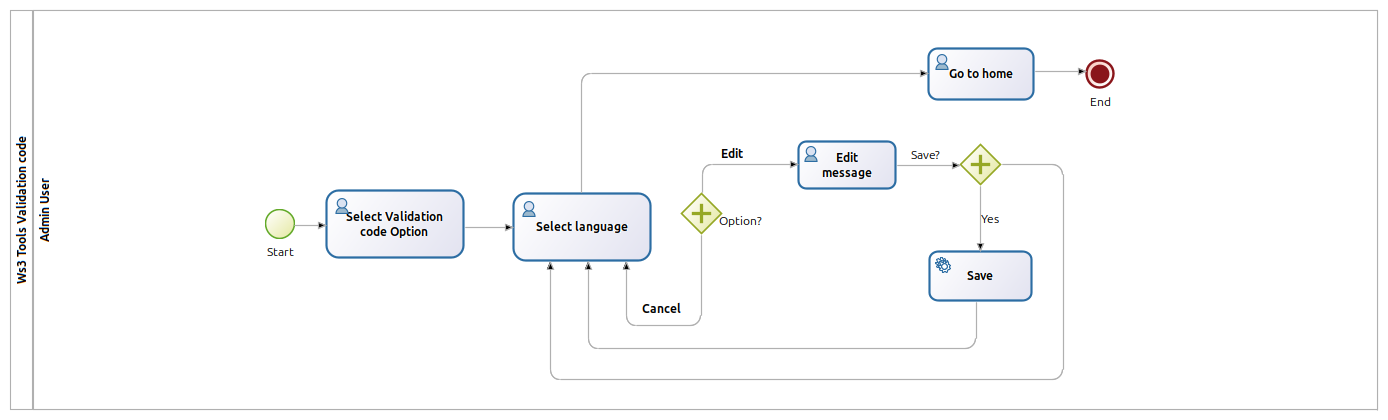
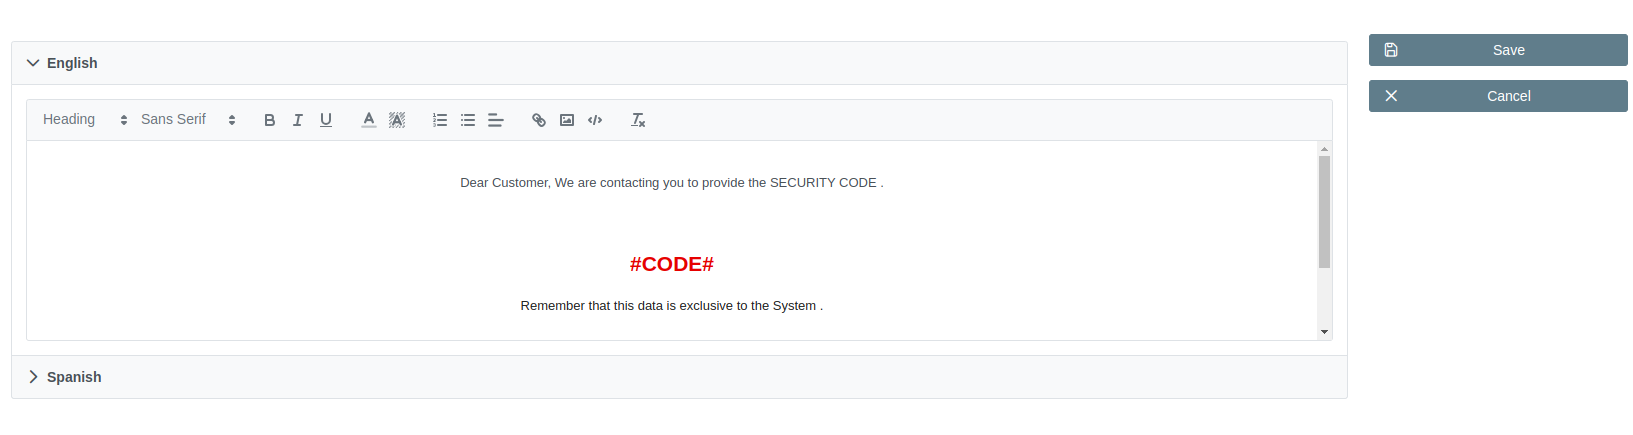
# 1.2- Validate Code
Clicking on page presents the view that allows the administrator to manage system modules.
Validate Code process.
User Interface.
# 1.2.1- Components
| Icon | Label | Type | Description |
|---|---|---|---|
| ➖ | Menssage area | Form | Show menssage of code. |
| Save Button | Command button | Save menssage. |
 | Cancel Button | Command button | cancels the editing of text |
# 1.2.2- Step by Step Update menssage
✅ 1. Select the language of the message you want to edit, using its tag that identifies the language of the message.
✅ 2. Edit the message in the corresponding language within the text area without modifying the #CODE#.
✅ 3. Check the edited message. If you agree process to click the save command button. If you do not agree, click the cancel button.
✅ 4. In case you do not want use this module click on the icon identified as HOME at the top right of the page to return to the main screen of the system.
------------## 1.2- Validate Code
Clicking on page presents the view that allows the administrator to manage system modules.
# 1.2.3- Components
| Icon | Label | Type | Description |
|---|---|---|---|
| ➖ | Menssage area | Form | Show menssage of code. |
| Save Button | Command button | Save menssage. |
| Cancel Button | Command button | cancels the editing of text |
# 1.2.4- Step by Step Update menssage
✅ 1. Select the language of the message you want to edit, using its tag that identifies the language of the message.
✅ 2. Edit the message in the corresponding language within the text area without modifying the #CODE#.
✅ 3. Check the edited message. If you agree process to click the save command button. If you do not agree, click the cancel button.
✅ 4. In case you do not want use this module click on the icon identified as HOME at the top right of the page to return to the main screen of the system.
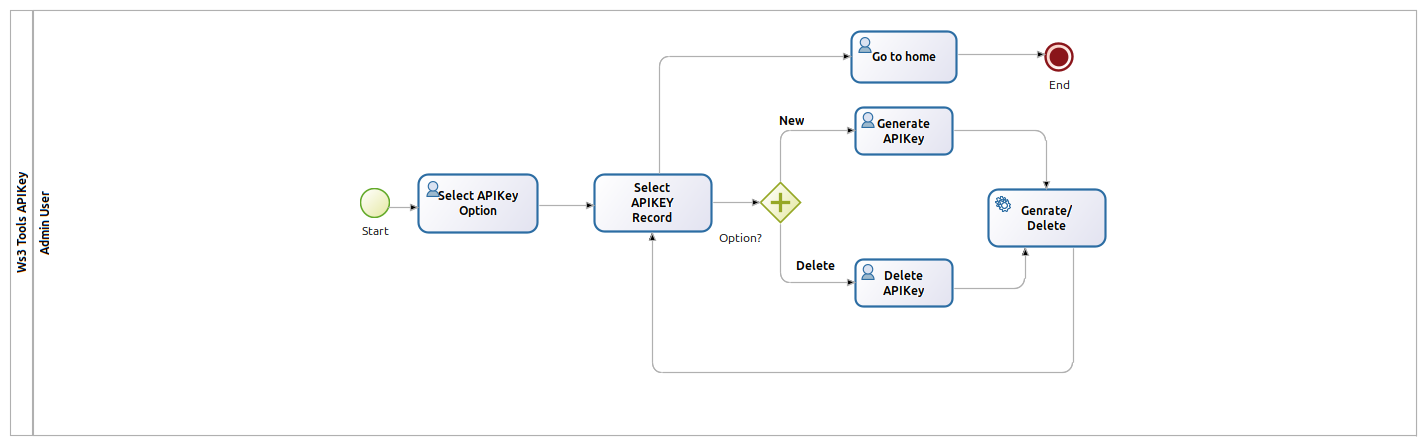
# 1.3- APIKey
Clicking on page presents the view that allows the administrator to manage system modules.
APIKey process.
User Interface.

# 1.3.1- Components
| Icon | Label | Type | Description |
|---|---|---|---|
| ➖ | Records | Table | Show number of modules. |
| ➖ | Api Key | Table field | Show Api Key of user. |
| ➖ | Create | Table field | Show date of creation. |
| ➖ | Last | Table field | Show last name of user. |
| ➖ | Actions | Table field | Show actions button. |
 | New Button | Command button | Creates a new Api Key. |
| Refresh Button | Command button | Refreshes the table. |
 | Delete Button | Command button | Delete Api key. |
# 1.3.2- Step by Step Add ApyKey
✅ 1. Clicking on page presents the view that allows the administrator to manage.
✅ 2. Clicking on page presents the view that allows the administrator to manage.
✅ 3. Clicking on page presents the view that allows the administrator to manage.
✅ 4. In case you do not want use this module click on the icon identified as HOME at the top right of the page to return to the main screen of the system.
# 1.3.3- Step by Step Delete ApyKey
✅ 1. Clicking on page presents the view that allows the administrator to manage.
✅ 2. Clicking on page presents the view that allows the administrator to manage.
✅ 3. In case you do not want use this module click on the icon identified as HOME at the top right of the page to return to the main screen of the system.
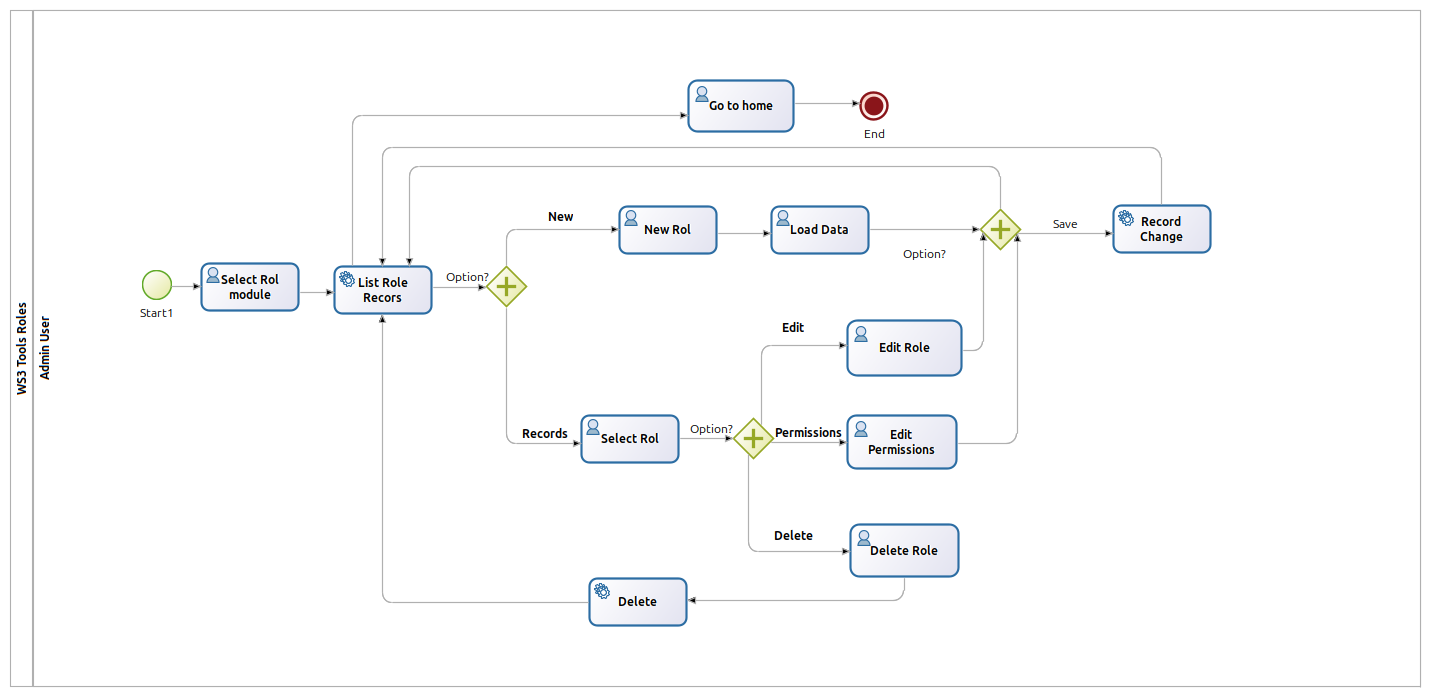
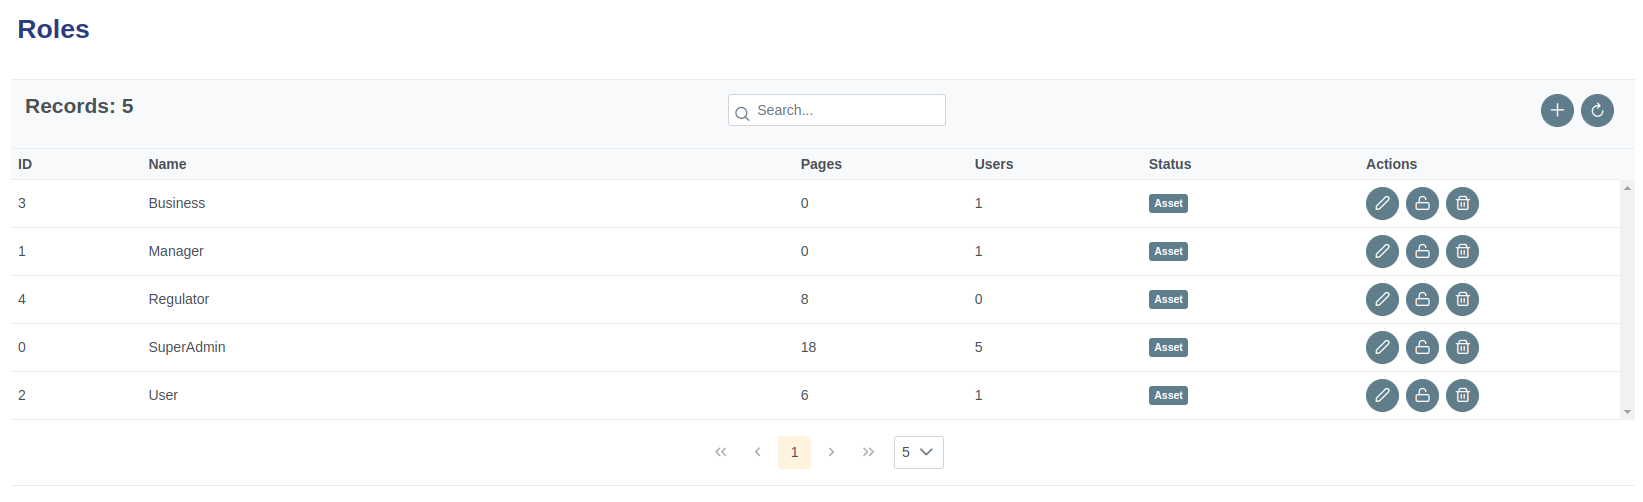
# 1.4- Roles
Clicking on roles page presents the view that allows the administrator to manage the roles and permissions of system users.
Roles process.
User Interface.
# 1.4.1- Components
| Icon | Label | Type | Description |
|---|---|---|---|
| ➖ | Records | Table | Show number of roles. |
| ➖ | ID | Table field | Show ID of role. |
| ➖ | Name | Table field | Show Name of role. |
| ➖ | Pages | Table field | Show Assigned pages. |
| ➖ | User | Table field | Show Assigned user. |
| ➖ | Status | Table field | Show status of role. |
| ➖ | Actions | Table field | Show actions button. |
| New Button | Command button | Creates a new role. |
| Refresh Button | Command button | Refreshes the table. |
 | Edit Button | Command button | Assign pages to the role. |
 | Permissions Button | Command button | Edit permissions to the role |
| Delete Button | Command button | Delete the role. |
# 1.4.2- Add Role form
Clicking on page presents the view that allows the administrator to manage system modules.
|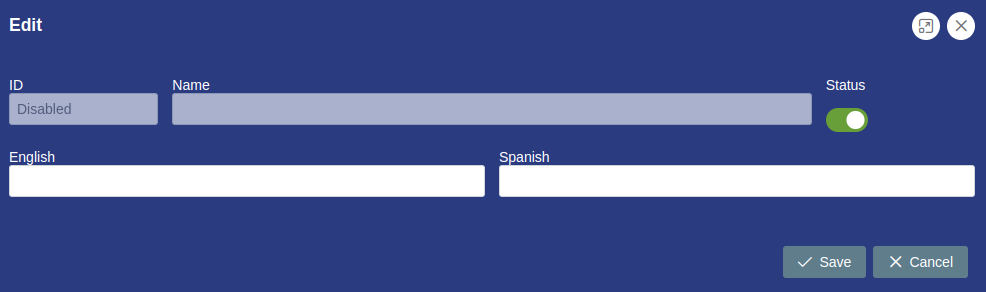
# 1.4.3- Components
| Icon | Label | Type | Description |
|---|---|---|---|
 | ➖ | Command button | Enlargewindow. |
 | ➖ | Command button | Close window. |
| ➖ | ID | String | Disable. |
| ➖ | Name | String | Disable. |
| ➖ | Icon | String | Incon module. |
| ➖ | Order | Number | Position of the module in view window. |
 | Status | Boolean button | Turn module on or off. |
| ➖ | English | String | Name of the module in English. |
| ➖ | Spanish | String | Name of the module in Spanish. |
| Save | Command button | Save button. |
| Refresh Button | Command button | Cancel button. |
# 1.4.4- Step by Step Add role
✅ 1. Click the command button to add role.
✅ 2. Complete the form fields with the requested data.
✅ 3. Click the save or cancel command button to hang from the case.
✅ 4. Verify the executed action.
# 1.4.5- Edit Role
Clicking on page presents the view that allows the administrator to manage system modules.
|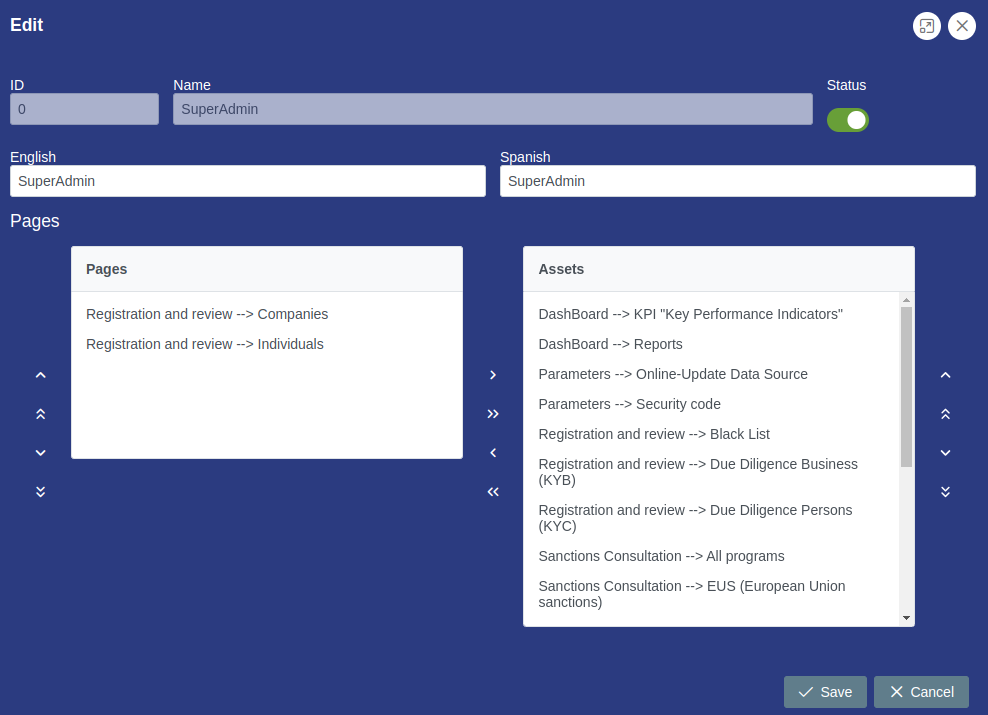
# 1.4.6- Components
| Icon | Label | Type | Description |
|---|---|---|---|
| ➖ | Command button | Enlargewindow. |
| ➖ | Command button | Close window. |
| ➖ | ID | String | Disable. |
| ➖ | Name | String | Disable. |
| ➖ | Icon | String | Incon module. |
| ➖ | Order | Number | Position of the module in view window. |
| Status | Boolean button | Turn module on or off. |
| ➖ | English | String | Name of the module in English. |
| ➖ | Spanish | String | Name of the module in Spanish. |
| Save | Command button | Save button. |
| Refresh Button | Command button | Cancel button. |
# 1.4.7- Step by Step Edit Role
✅ 1. Click the command button to edit role.
✅ 2. Edit the required field or fields or assign pages to the role.
✅ 3.Use the command arrows to scroll or assign pages.
✅ 4. Click the save or cancel command button to hang from the case.
✅ 5. Verify the executed action.
# 1.4.8- Activate or Edit permission
Clicking on page presents the view that allows the administrator to manage system modules.
|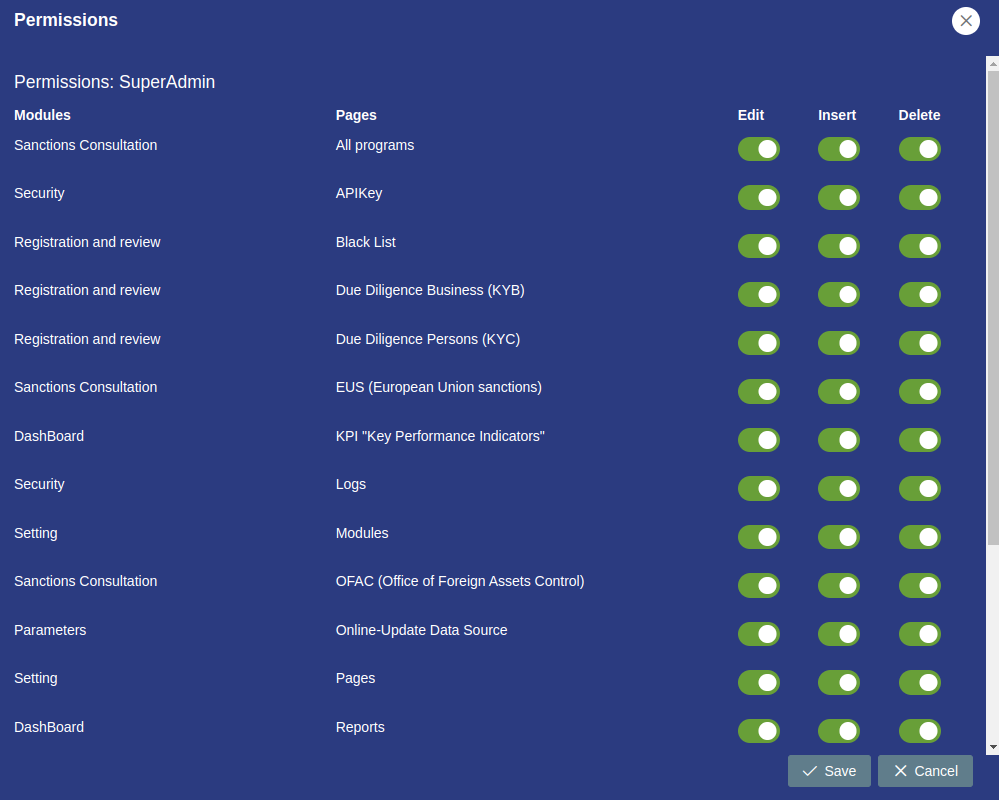
# 1.4.9- Components
| Icon | Label | Type | Description |
|---|---|---|---|
| ➖ | Command button | Enlargewindow. |
| ➖ | Command button | Close window. |
| ➖ | ID | String | Disable. |
| ➖ | Name | String | Disable. |
| ➖ | Icon | String | Incon module. |
| ➖ | Order | Number | Position of the module in view window. |
| Status | Boolean button | Turn module on or off. |
| ➖ | English | String | Name of the module in English. |
| ➖ | Spanish | String | Name of the module in Spanish. |
| Save | Command button | Save button. |
| Refresh Button | Command button | Cancel button. |
# 1.4.10- Step by Step Activate or Edit permission
✅ 1. Click the edit permissions button.
✅ 2. Enable proper permissions using Boolean controls.
✅ 3. Click the save or cancel command button to hang from the case.
✅ 4. Verify the executed action.
# 1.4.11- Step by Step delete Role
✅ 1. Click the command button to delete role.
✅ 2. Verify the executed action.
# 1.5- Modules
Clicking on modules page presents the view that allows the administrator to manage system modules.
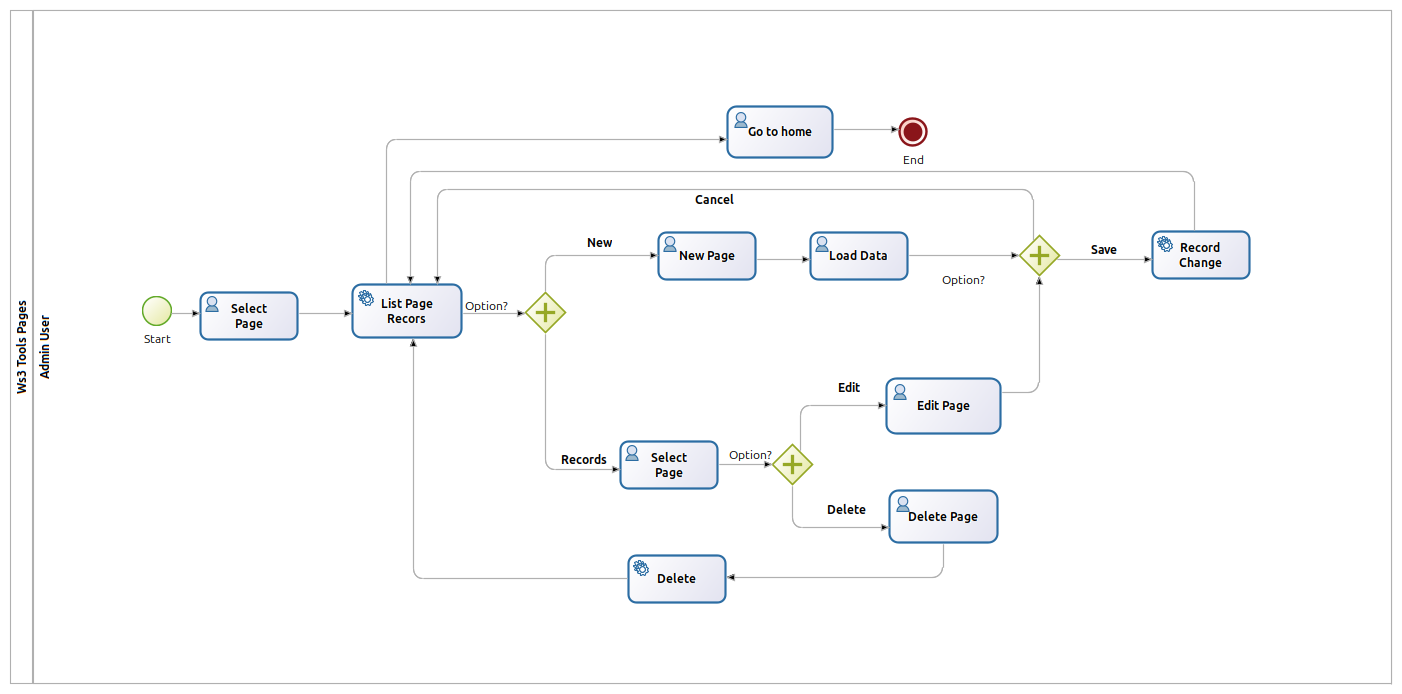
Modules process.
User Interface.
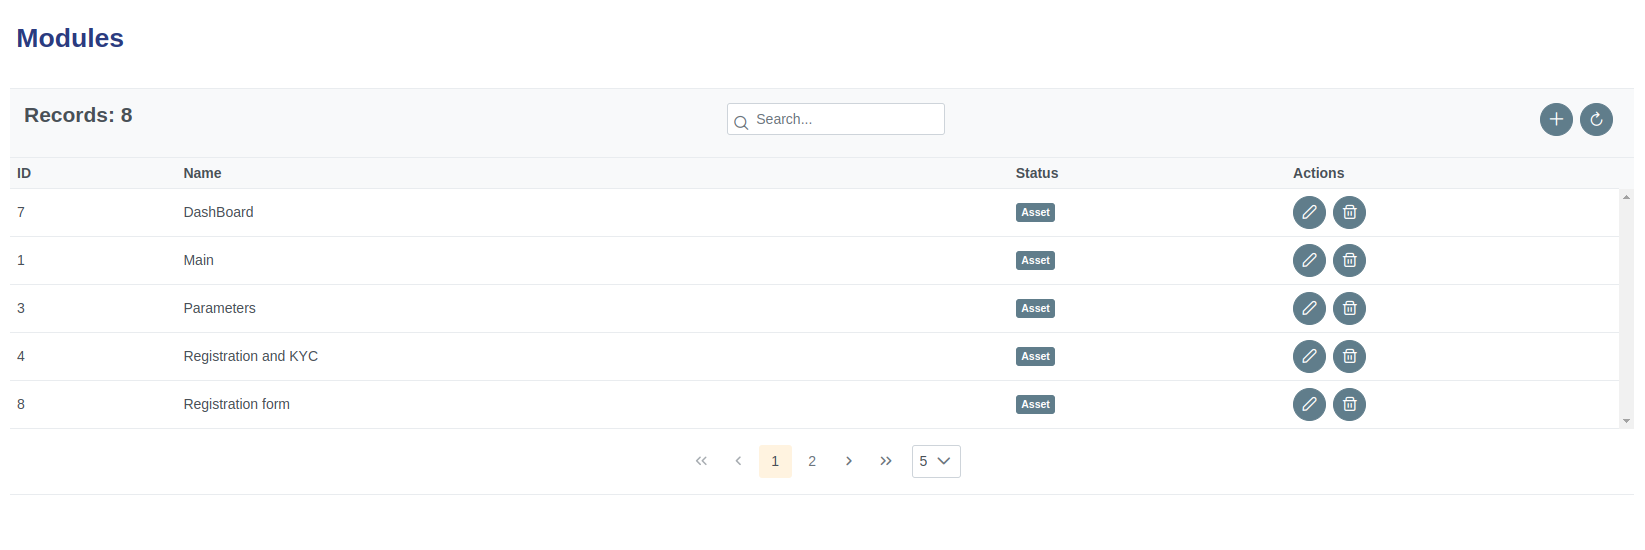
# 1.5.1- Components
| Icon | Label | Type | Description |
|---|---|---|---|
| ➖ | Records | Table | Show number of modules. |
| ➖ | ID | Table field | Show ID of module. |
| ➖ | Name | Table field | Show Name of module. |
| ➖ | Status | Table field | Show status of module. |
| ➖ | Actions | Table field | Show actions button. |
| New Button | Command button | Creates a new module. |
| Refresh Button | Command button | Refreshes the table. |
| Edit Button | Command button | Edit module. |
| Delete Button | Command button | Delete module. |
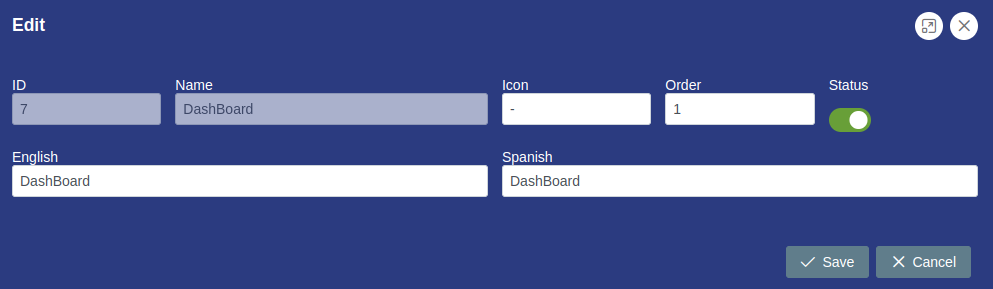
# 1.5.2- Add Module form
Clicking on page presents the view that allows the administrator to manage system modules.
|
# 1.5.3- Components
| Icon | Label | Type | Description |
|---|---|---|---|
| ➖ | Command button | Enlargewindow. |
| ➖ | Command button | Close window. |
| ➖ | ID | String | Disable. |
| ➖ | Name | String | Disable. |
| ➖ | Icon | String | Incon module. |
| ➖ | Order | Number | Position of the module in view window. |
| Status | Boolean button | Turn module on or off. |
| ➖ | English | String | Name of the module in English. |
| ➖ | Spanish | String | Name of the module in Spanish. |
| Save | Command button | Save button. |
| Refresh Button | Command button | Cancel button. |
# 1.5.4- Step by Step Add Module
✅ 1. Click the command button to add module.
✅ 2. Complete the form fields with the requested data.
✅ 3. Click the save or cancel command button to hang from the case.
✅ 4. Verify the executed action.
# 1.5.5- Edit Module
Clicking on page presents the view that allows the administrator to manage system modules.
|
# 1.5.6- Step by Step Edit Module
✅ 1. Click the command button to edit module.
✅ 2. Edit the required field or fields.
✅ 3. Click the save or cancel command button to hang from the case.
✅ 4. Verify the executed action.
# 1.5.7- Step by Step Delete Module
✅ 1. Click the command button to delete module.
✅ 2. Verify the executed action.
# 1.6- Pages
Clicking on page presents the view that allows the administrator to manage the modules of the system.
Pages process.
User Interface.
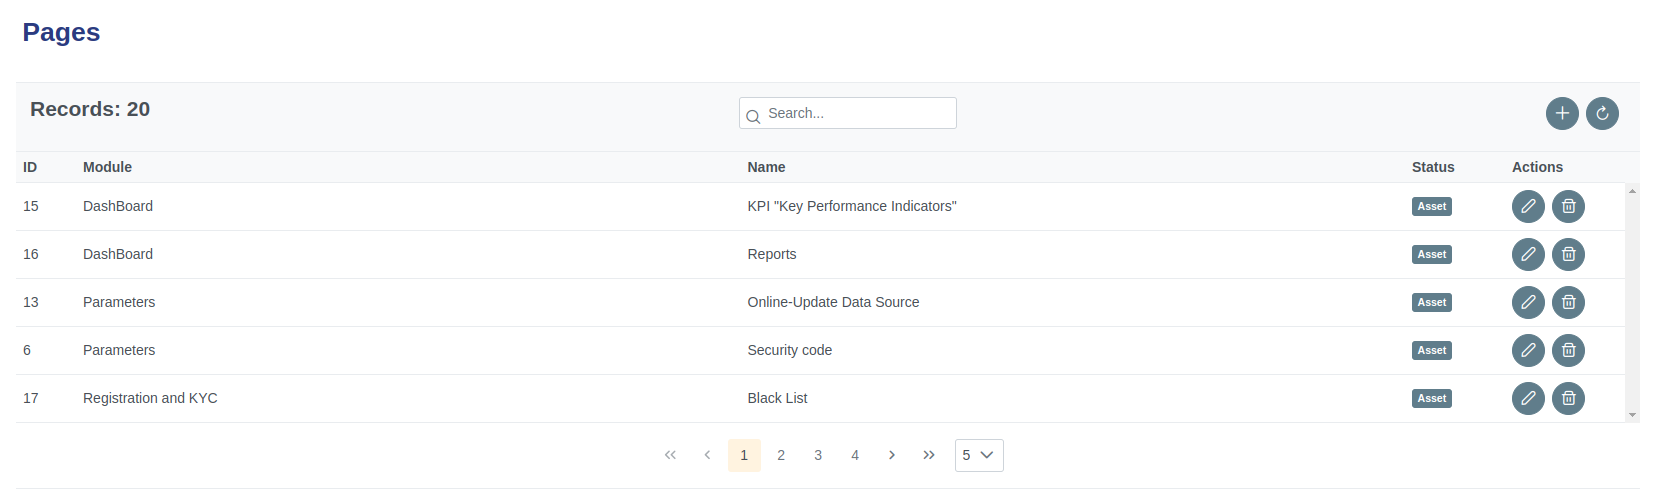
# 1.6.1- Components
| Icon | Label | Type | Description |
|---|---|---|---|
| ➖ | Records | Table | Show number of page. |
| ➖ | ID | Table field | Show ID of page. |
| ➖ | Module | Table field | Show module of page. |
| ➖ | Name | Table field | Show Name of page. |
| ➖ | Status | Table field | Show status of page. |
| ➖ | Actions | Table field | Show actions button. |
| New Button | Command button | Creates a new page. |
| Refresh Button | Command button | Refreshes the table. |
| Edit Button | Command button | Edit page. |
| Delete Button | Command button | Delete page. |
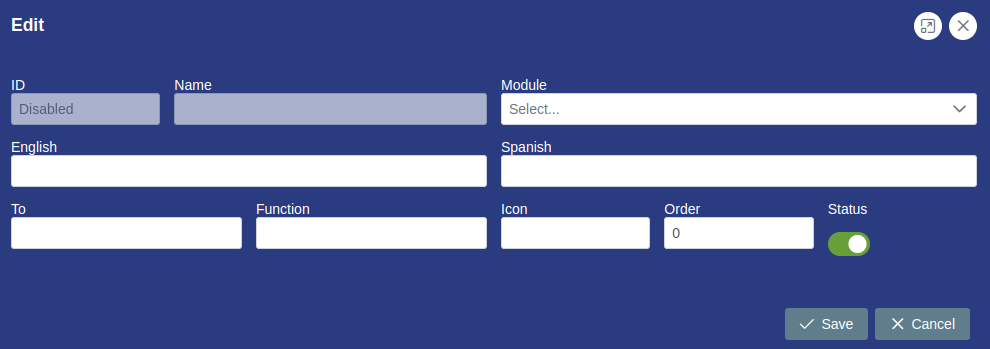
# 1.6.2- Add Pages form
Clicking on page presents the view that allows the administrator to manage system modules.
 |
|---|
# 1.6.3- Components
| Icon | Label | Type | Description |
|---|---|---|---|
| ➖ | Command button | Enlargewindow. |
| ➖ | Command button | Close window. |
| ➖ | ID | String | Disable. |
| ➖ | Name | String | Disable. |
| ➖ | Module | String | Selection of the module to assign the page. |
| ➖ | English | String | Name of the page in English. |
| ➖ | Spanish | String | Name of the page in Spanish. |
| ➖ | To | String | Reference name of the page. |
| ➖ | Funtion | String | Reference name funtion of the page. |
| ➖ | Icon | String | Incon page. |
| ➖ | Order | Number | Position of the page in view window. |
| Status | Boolean button | Turn page on or off. |
| Save | Command button | Save button. |
| Refresh Button | Command button | Cancel button. |
# 1.6.4- Step by Step Add page
✅ 1. Click the command button to add page.
✅ 2. Complete the form fields with the requested data.
✅ 3. Click the save or cancel command button to hang from the case.
✅ 4. Verify the executed action.
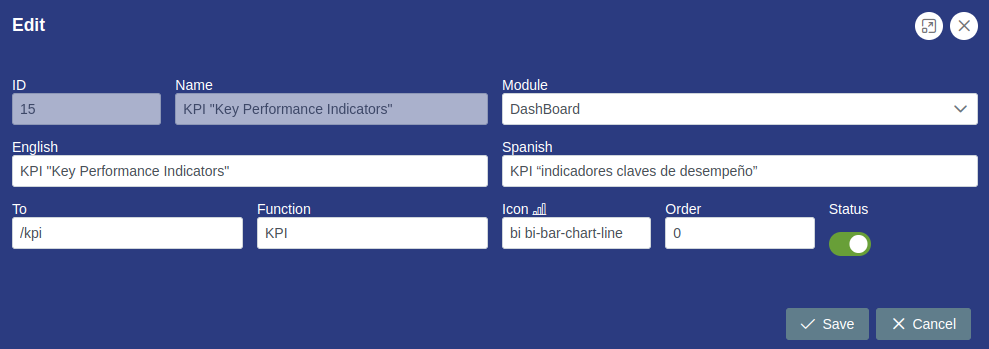
# 1.6.5- Edit Page
Clicking on page presents the view that allows the administrator to manage system modules.
|
# 1.6.6- Step by Step Edit Page
✅ 1. Click the command button to edit page.
✅ 2. Edit the required field or fields.
✅ 3. Click the save or cancel command button to hang from the case.
✅ 4. Verify the executed action.
# 1.6.7- Step by Step delete Page
✅ 1. Click the command button to delete page.
✅ 2. Verify the executed action.
# 1.7- Users
Clicking on users page presents the view that allows the administrator to manage system modules.
Users process.

User Interface.
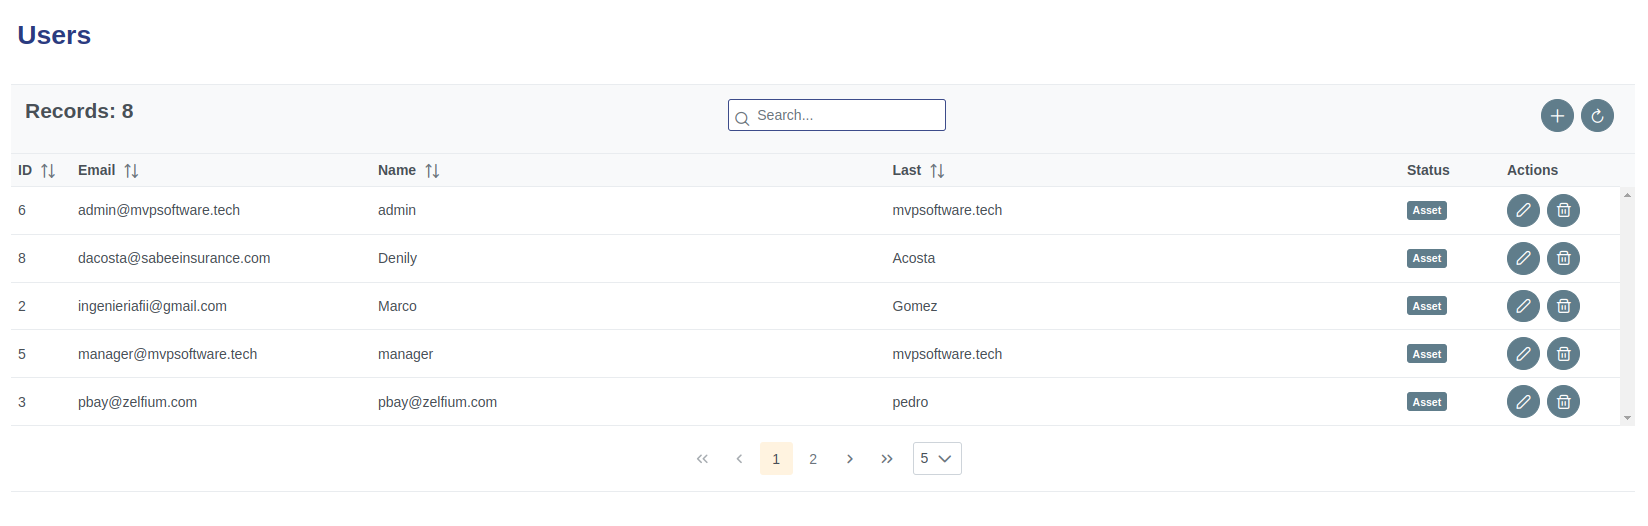
# 1.7.1- Components
| Icon | Label | Type | Description |
|---|---|---|---|
| ➖ | Records | Table | Show number of modules. |
| ➖ | ID | Table field | Show ID of user. |
| ➖ | Name | Table field | Show Name of user. |
| ➖ | Last | Table field | Show last name of user. |
| ➖ | Status | Table field | Show status of user. |
| ➖ | Actions | Table field | Show actions button. |
| New Button | Command button | Creates a new user. |
| Refresh Button | Command button | Refreshes the table. |
| Edit Button | Command button | Edit user. |
| Delete Button | Command button | Delete user. |
# 1.7.2- Add User form
|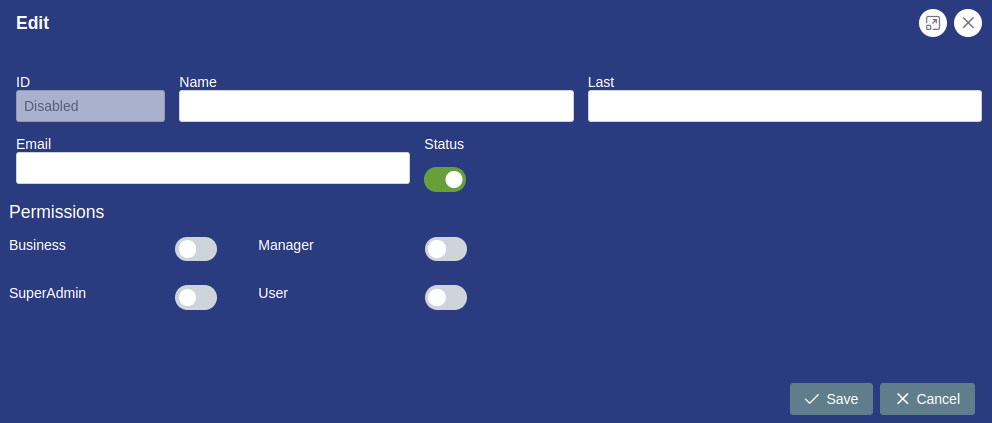
# 1.7.3- Components
| Icon | Label | Type | Description |
|---|---|---|---|
| ➖ | Command button | Enlargewindow. |
| ➖ | Command button | Close window. |
| ➖ | ID | String | Disable. |
| ➖ | Name | String | Disable. |
| ➖ | Icon | String | Incon module. |
| ➖ | Order | Number | Position of the module in view window. |
| Status | Boolean button | Turn module on or off. |
| ➖ | English | String | Name of the module in English. |
| ➖ | Spanish | String | Name of the module in Spanish. |
| Save | Command button | Save button. |
| Refresh Button | Command button | Cancel button. |
# 1.7.4- Step by Step Add User
✅ 1. Click the command button to add user.
✅ 2. Complete the form fields with the requested data.
✅ 3. Enable the role to be assigned to the user.
✅ 3. Click the save or cancel command button to hang from the case.
✅ 4. Verify the executed action.
# 1.7.5- Edit User
Clicking on page presents the view that allows the administrator to manage system modules.
|
# 1.7.6- Step by Step Edit User
✅ 1. Click the command button to edit user.
✅ 2. Edit the required field or fields.
✅ 3. Click the save or cancel command button to hang from the case.
✅ 4. Verify the executed action.
# 1.7.7- Step by Step Delete User
✅ 1. Click the command button to delete user.
✅ 2. Verify the executed action.
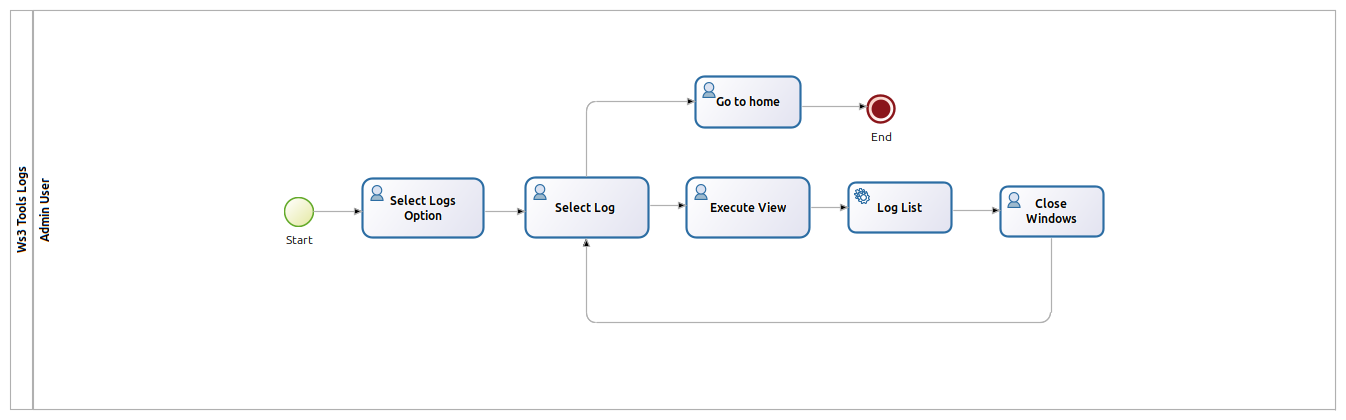
# 1.8- Logs
Clicking on logs page presents the view that allows the administrator to manage system modules.
Logs process.
User Interface.

# 1.8.1- Components
| Icon | Label | Type | Description |
|---|---|---|---|
| ➖ | Records | Table | Show system logs. |
| ➖ | ID | Table field | Show ID of user. |
| ➖ | Table field | Show email of user. | |
| ➖ | Name | Table field | Show name of user. |
| ➖ | Last entry | Table field | Show last entry into the system. |
| ➖ | Actions | Table field | Show actions button. |
| Refresh Button | Command button | Refreshes the table. |
 | View Button | Command button | View detail. |
# 1.8.2- View log
|
# 1.8.3- Components
| Icon | Label | Type | Description |
|---|---|---|---|
| ➖ | Command button | Enlargewindow. |
| ➖ | Command button | Close window. |
| ➖ | Date | String | Time Stamp. |
| ➖ | Type | String | Type of action. |
| ➖ | Table | String | Table of DB affected |
| ➖ | Code | String | operating code. |
| ➖ | IP | String | Connection IP address. |
# 1.8.4- Step by Step View log
✅ 1. Click the command button to view log.
✅ 2. Review the user log information.
✅ 3. Click the close window button to exit.